")
")


Hi, I’m Katrina, the artist behind Lindale Studios—a creative space where color, texture, and storytelling all come together. My work lives at the intersection of art and life, inspired by travel, family, and the everyday beauty I find around me. At Lindale Studios, I hand paint styling mats, backdrops, and pieces that are meant to spark inspiration, bring warmth into spaces, and show how color can transform the way we feel.
Today, I want to share about how I build a moodboard!
The 8 STEPS are below, but I want to share some other things with you that require a little more depth! But if you want the quick list, feel free to scroll to the bottom!
How Do I Build a Moodboard?
I don’t think there’s just one way to build a moodboard, but I can share how I get inspired to create mine.
Moodboards are vital in my creative process. They’re the jumpstart to any large project. Computers and screens are great, but nothing can replace tangible pieces you can hold in your hands—the ones that spark not only ideas about color, but also about how the elements I’ll be photographing or painting will truly come to life.
It makes it easier when you have a purpose and a reason to create the moodboard. For these moodboards, I was working out the colors and styles for the double sided backdrop launching soon.
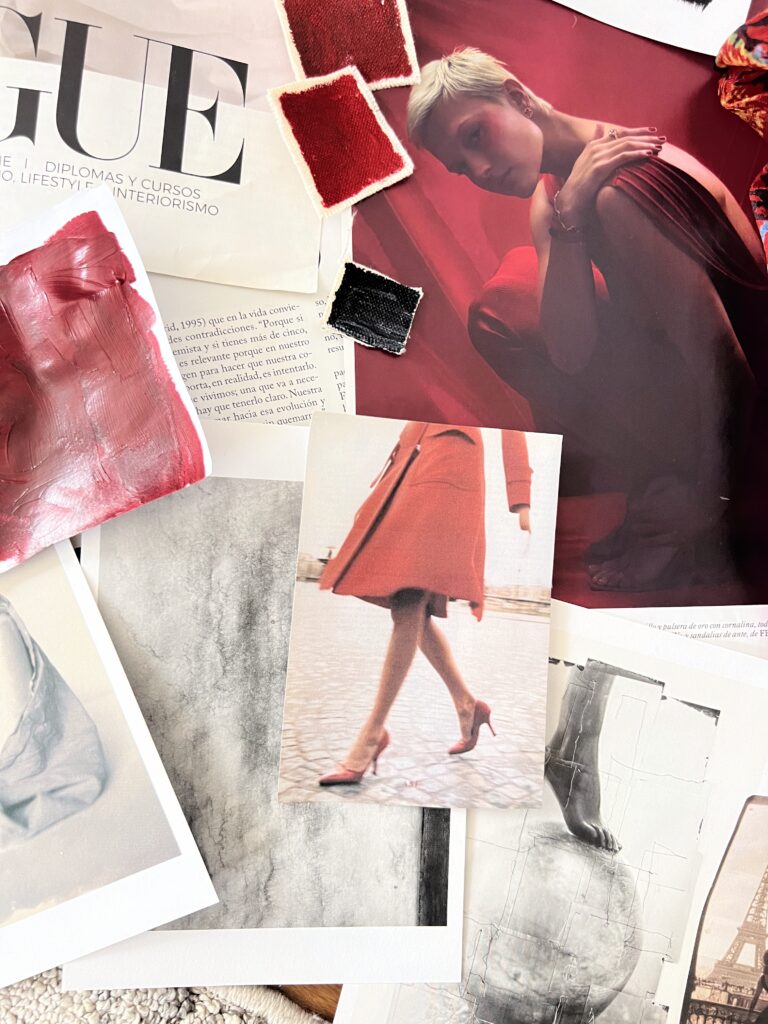
I’m always preparing for moodboards. I think about them when I’m thrifting, when I travel, or whenever inspiration strikes. If I spot a magazine I love at the salon, I’ll track it down and buy it. Moodboards don’t just happen for me—I’m constantly collecting, storing, and dreaming of inspiration so I have a foundation to build from.
A moodboard helps me stay inspired while also pointing me in a clear direction.
Four Things to Keep in Mind
-
I always have more swatches than anything else on a normal board (because my end goal is to paint).
-
I collect inspiration all the time: postcards from travel, photos I take, textures I love, and more.
-
I create from what I already have. I’ll print a few new things, but most of my boards come from pieces I’ve been inspired by and tucked away in a drawer or container in my studio.
-
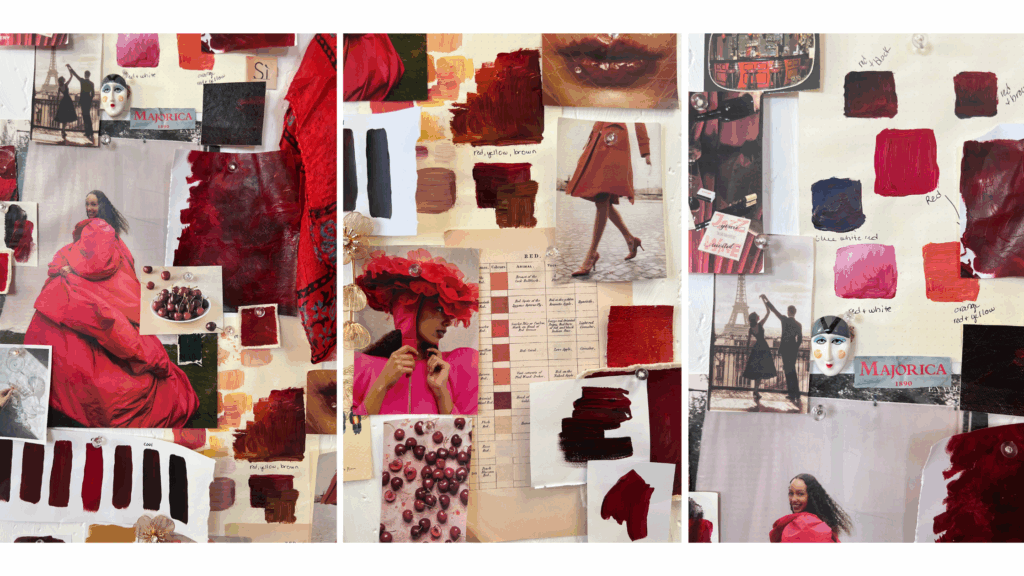
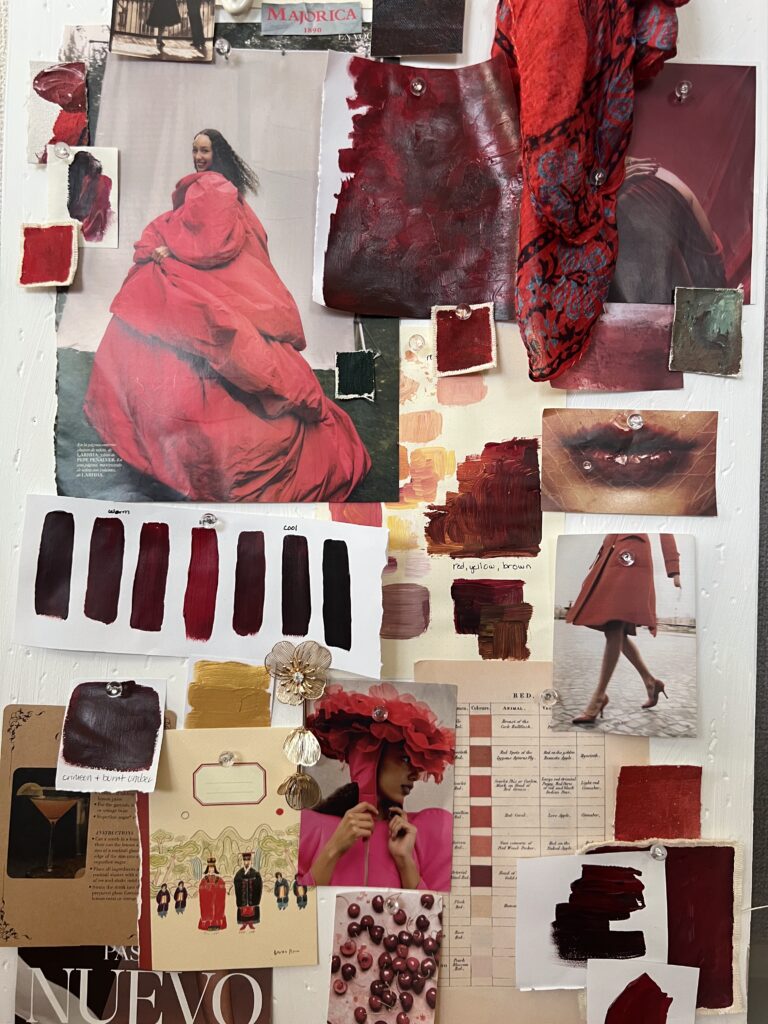
I often start with words. For this board, mine were bold, movement, and romantic. These words don’t always reflect my personal take—for example, I may not see Paris as a romantic city, but many people do, and that perspective shapes the inspiration too.
Two moodbaords for a two sided styling mat:
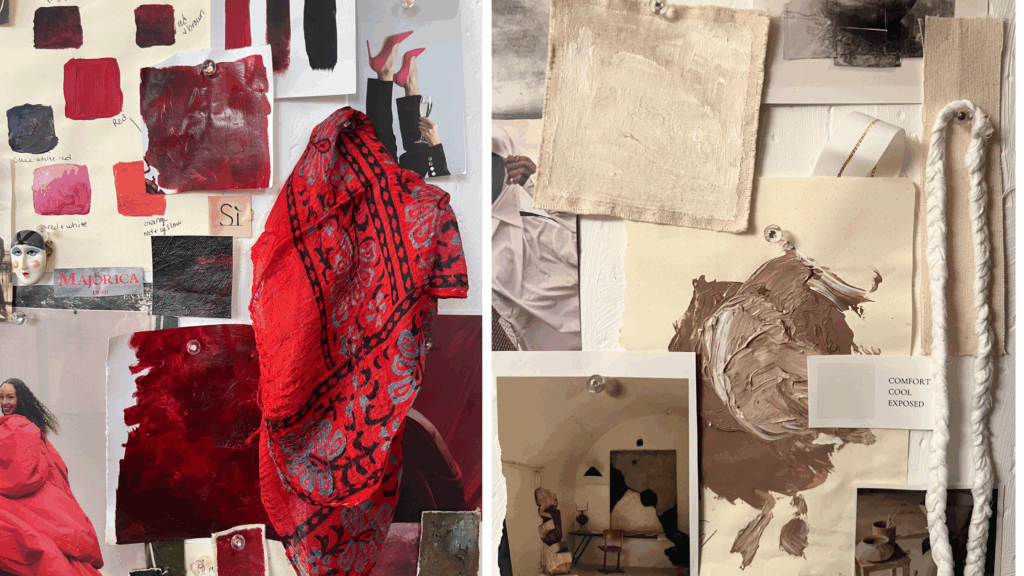
The Deep Red Moodboard
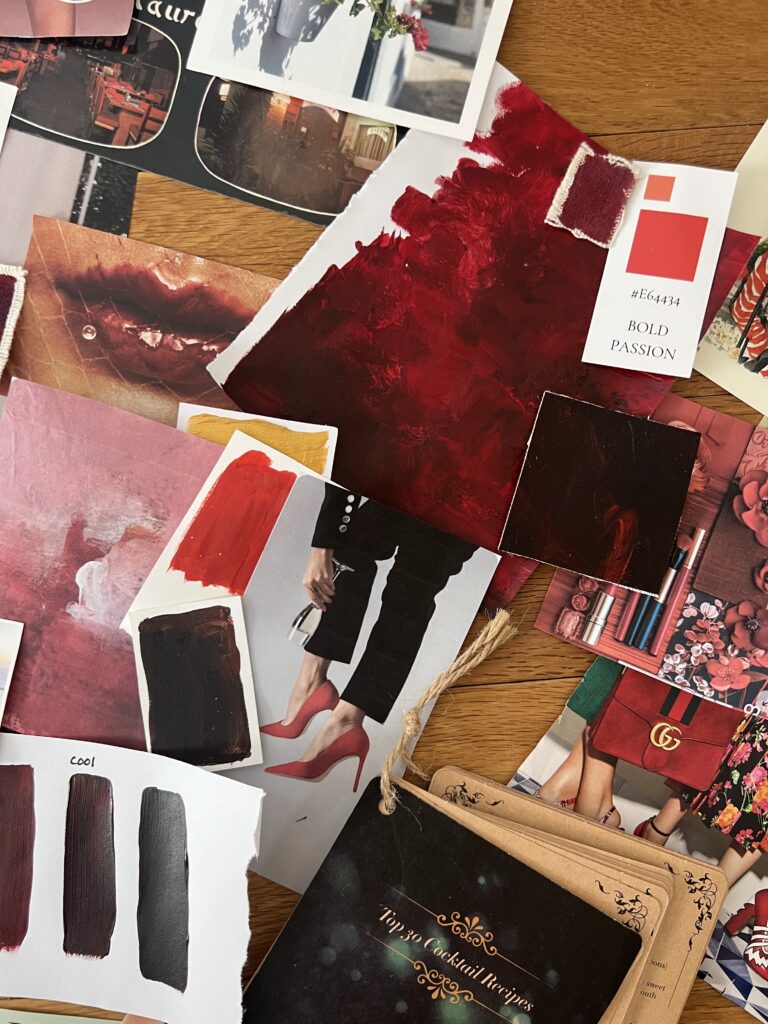
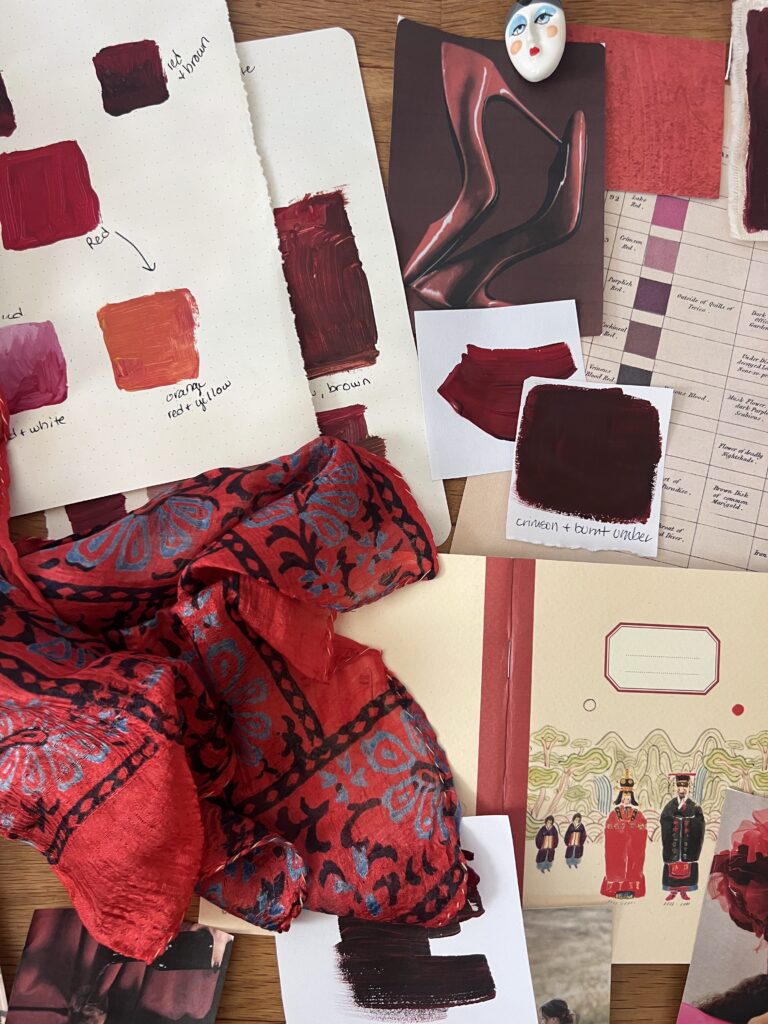
For this board, I started with a red swatch and built two variations: a warm red (mixed with brown) and a cool red (mixed with black). It was fascinating to see the range of options.
I experimented with layering different reds and darker tones to create a rich, dimensional look. Even though not every experiment made it onto the final board, playing with those ideas gave me inspiration and helped me decide which direction to take. The goal wasn’t simply “red”—it was to explore what red could become.
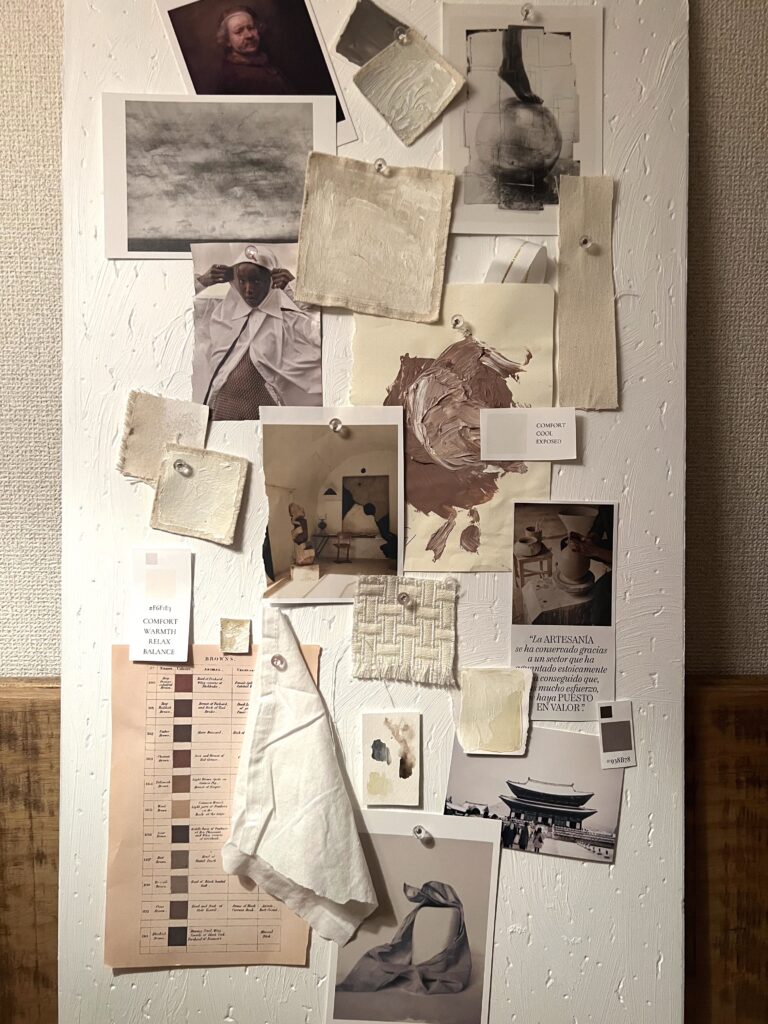
The Neutral Moodboard
Since this mat is double-sided, I also created a neutral moodboard for balance. This board was simpler—focused on keeping things minimal, soft, and versatile, using neutrals that could lean either warm or cool.
I also revisited old photos, flipped through favorite magazines, and pulled out textures I’d saved in my charts and studio drawers. A few metallic elements added shine, and I layered in subtle hints of green (red’s complementary color) for contrast.
What I Use
-
A board: For this one, I grabbed a piece of thin drywall from a thrift shop! You can use foam core, wood, fabric-wrapped boards—whatever you can get your hands on. I painted mine with gesso for a clean white texture.
-
Images: Photos, magazine clippings, prints, postcards.
-
Color elements: Paint swatches, charts, samples.
-
Textures: Fabric scraps, jewelry, metallics, or even coins.
Tip: I like to include at least three different materials—for example, paper, fabric, paint, and something metallic.
How I Start
Honestly, there’s no strict system. Usually I anchor the board with a large “statement” photo—something bold and eye-catching.
Because my boards are swatch-heavy, I often tear things out of notebooks and then place them strategically, working from the upper left-hand corner down to the lower right-hand corner. I’ll group warm and cool tones to keep balance and flow.
How Do You Know When a Moodboard is Finished?
The answer? You don’t. 🙂
For me, moodboards are never really “done.” I love them layered, messy, and evolving. When I step back and feel inspired—not by Pinterest or someone else’s perspective, but by my own—that’s when I know the board is working.
THE 8 STEPS: Build a Moodboard, and Inspire Creativity:
1. Start Collecting Early
I’m always gathering inspiration—postcards from travel, textures I love, photos I take, magazines I buy. A moodboard doesn’t happen in one sitting—it grows from the things you’ve been saving.
2. Choose Guiding Words
Sometimes I start with words. For this board: BOLD, MOVEMENT, ROMANTIC. They help shape what I look for, whether it’s colors, textures, or images.
3. Experiment with Color
For this board, I began with red swatches—testing warm red (mixed with brown) and cool red (mixed with black). Experimenting gave me options and direction, even if not every version made the board.
4. Gather and Edit
I pulled old photos, flipped through magazines, and checked my color charts for anything with red tones. I added metallics and a few hints of green (red’s complement) for balance.
5. Choose a Base
I used a thin piece of drywall from a thrift shop, painted with gesso. You can use foam core, wood, fabric-wrapped boards—anything works.
6. Layer With Variety
I like to include at least three different textures:
-
paper (photos, magazine clippings)
-
fabric (swatches, scraps)
-
metallics (jewelry, pins, coins)
7. Build the Board
I usually start with a “statement” image, then build around it. Since my boards are swatch-heavy, I layer strategically, often working from the top left to the bottom right. Warm and cool tones sometimes get grouped together.
8. Step Back
When is a moodboard finished? Honestly, it never really is. I prefer mine layered and imperfect—enough that when I step back, I feel inspired in my own way.
Any other thoughts, or want to know how moodboards are a way to inspire your brand visuals? Check out this Free Guide HERE!
Go and make your moodboard today to inspire your next project and let me know how it goes on Instagram!
Always here for you, it’s gonna be great!
Katrina


+ show Comments
- Hide Comments
add a comment